My EK/Ej Civic HB rebuild to V6 powered 56k beware


moar updates

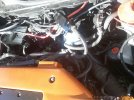
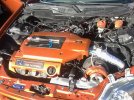
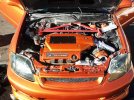
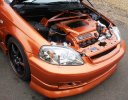
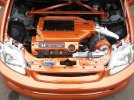
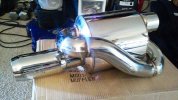
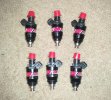
-Thanks to EK9 member Tama666, for pointing me in the right direction for a small Radiator. ChaseBays Radiator tuck. So i can have more clearance for my turbo. bigger turbo piping aswell. Ill also get the j pipe cut and re-position the turbo for better clearance. Also finally get a filter on it or cold air tube attached.

Hopefully get more of the engine bay tucked and etc. here are some mock up pictures of what it somewhat look like.

attachment.php


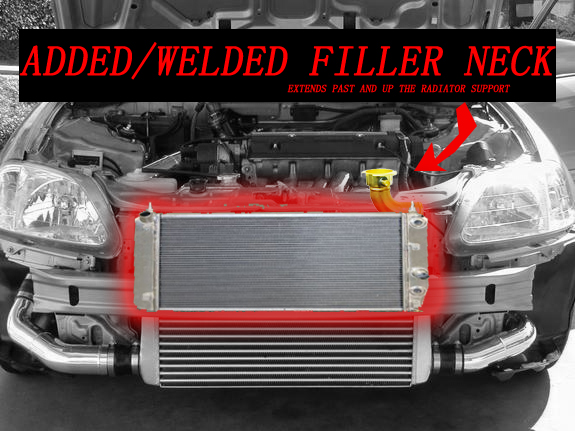
not going to weld a filler neck. just ill add one.

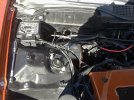
photoshopped pic of how it should look like after the radiator been relocated and turbo re positioned
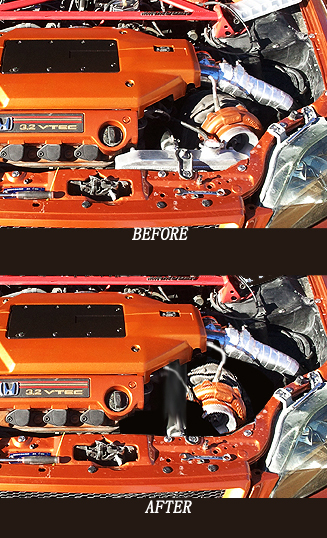
attachment.php


enjoy :D
 

Attachments

  • $proto type.jpg
    $proto type.jpg
    192 KB · Views: 7,233
  • $before and after.jpg
    $before and after.jpg
    281.6 KB · Views: 3,501
Last edited:
Moar updates :D

Finally the Cf skinning hood dried! Started sanding, and almost done. But more sanding is needed. Also need to drill washer holes too. i added some water to wet the hood to see how it looks so far. enjoy

attachment.php


attachment.php


i forgot to upgrade my pedals. i bought some Mugen ones, and civic ek eye brows. Since not many like do it, im going to add them for kick's. also to be a bit more different lol

attachment.php


attachment.php


also got my OBX Twinloop "Mugen replica" muffler in yay!!

attachment.php


attachment.php


also my RC750cc Injectors

attachment.php


Attachments

  • $twinloop.jpg
    $twinloop.jpg
    300.9 KB · Views: 3,338
  • $twinloop1.jpg
    $twinloop1.jpg
    48.5 KB · Views: 3,356
  • $moarstuff.jpg
    $moarstuff.jpg
    53 KB · Views: 3,357
  • $mugenpedals.jpg
    $mugenpedals.jpg
    57.6 KB · Views: 3,408
  • $DSC_8120.JPG
    $DSC_8120.JPG
    328.8 KB · Views: 3,388
  • $DSC_8124.JPG
    $DSC_8124.JPG
    311.7 KB · Views: 3,380
  • $750ccRc.jpg
    $750ccRc.jpg
    66.9 KB · Views: 3,295
Last edited:
well some small updates. put on the eye brows, installed my Mugen pedals

attachment.php


finally got a chance to go out at night and adjust my HID retofitted headlights. parked pretty close to the wall. but got it where i need it. works awesome!!

eye brows installed
attachment.php


how the headlights look at night
attachment.php


alining the HID projector beam these were H1 8000k Bulbs
attachment.php


also getting a engine harness tuck done and getting am AEM EMS 2 for better full control tuning over the engine. still need to get my new 3" exhaust done, and etc. in the final sanding stages of the Carbon fiber hood skinning. looking awesome so far!!

enjoy
 

Attachments

  • $2013-01-17 15.56.11.jpg
    $2013-01-17 15.56.11.jpg
    62.9 KB · Views: 3,469
  • $2013-01-17 20.39.19.jpg
    $2013-01-17 20.39.19.jpg
    246.3 KB · Views: 3,239
  • $2013-01-17 20.39.06.jpg
    $2013-01-17 20.39.06.jpg
    188.7 KB · Views: 3,283
FINALLY!!!! fighting the endlessly seemingly battle with sanding. i finished the carbon fiber skinning. UV clear coat and cut and buff. then drilled the washer holes "but need to make bigger to fit. i think it came out awesome for the first try.

also removed the eye brows. wasn't fitting my taste for now. XD.


attachment.php


attachment.php


attachment.php


attachment.php


attachment.php


attachment.php


attachment.php


yay! So for more updates, ordered ChaseBays engine tuck harness, and getting the AEM EMS 2. got my Yonaka resonator, and ordered Vibrant 3" hiflow catalytic converter that CARB legal. so i can still pass emissions if need be. will be bolt on.


Attachments

  • $2013-01-21 16.34.13.jpg
    $2013-01-21 16.34.13.jpg
    62.4 KB · Views: 3,101
  • $2013-01-21 16.34.04.jpg
    $2013-01-21 16.34.04.jpg
    77.2 KB · Views: 4,304
  • $2013-01-21 16.35.28.jpg
    $2013-01-21 16.35.28.jpg
    65.7 KB · Views: 3,067
  • $2013-01-21 15.44.48.jpg
    $2013-01-21 15.44.48.jpg
    92 KB · Views: 3,107
  • $2013-01-21 15.44.44.jpg
    $2013-01-21 15.44.44.jpg
    78 KB · Views: 3,043
  • $2013-01-21 16.40.31.jpg
    $2013-01-21 16.40.31.jpg
    76.4 KB · Views: 3,130
  • $2013-01-21 16.40.42.jpg
    $2013-01-21 16.40.42.jpg
    381.7 KB · Views: 3,931
Last edited:
new stuff

-finally finished my rear upper back rest in leather.
attachment.php


attachment.php


-relocated my battery with a new Odessy PC680 to the trunk for the time being. also installed new C-pillar upper bar and rear lower strut bar

attachment.php


attachment.php


-still waiting on OEM battery terminals and Password JDM battery relocate.

-also my CTR JDM power folding mirrors came in

attachment.php


installed!

-installed new grill mesh for the upper and lower, plus the fog light empty spots.
-Painted my inter cooler piping and intercooler flat black to the more sleeper/ N/A look.

attachment.php

closed

attachment.php

open

attachment.php


attachment.php


more updates to come.
-finish wiring my CTR folding mirrors to my alarm. open and close when arm and disarm
-soon replacing my old viper alarm with a 2 way one "w/ new door actuators"
-add new driver side fender splash guard "never came with one"
-add auto window roll up to new alarm
-add tilt sensors for new alarm
-waiting on last things for 3" exhaust upgrade


i think thats it for updates :D.

enjoy!


Attachments

  • $rear top back rest.jpg
    $rear top back rest.jpg
    215.7 KB · Views: 3,012
  • $rear seats 2.jpg
    $rear seats 2.jpg
    45.3 KB · Views: 4,059
  • $rear trunk view.jpg
    $rear trunk view.jpg
    65.9 KB · Views: 9,196
  • $trunk.jpg
    $trunk.jpg
    344.4 KB · Views: 11,926
  • $side.jpg
    $side.jpg
    54.5 KB · Views: 3,102
  • $front angle2.jpg
    $front angle2.jpg
    78 KB · Views: 3,011
  • $front angle.jpg
    $front angle.jpg
    62.4 KB · Views: 390
  • $jdm fold.jpg
    $jdm fold.jpg
    63.3 KB · Views: 4,307
  • $ctr.jpg
    $ctr.jpg
    354.6 KB · Views: 3,262
  • $rear angle 2.jpg
    $rear angle 2.jpg
    83.8 KB · Views: 3,332
Last edited:
ill just leave this here for updates
attachment.php
 

Attachments

  • $2013-01-28 12.03.05.jpg
    $2013-01-28 12.03.05.jpg
    76.1 KB · Views: 4,302
umm... WHY?? what happened?!?! lol
just started on cleaning up the engine bay. worked on wire tuck the head lights wire. also getting things more clean looking instead of messy. still alot to do


chasebays? :))
i wish, there not finished with my stuff yet. harness 50% and radiator tuck 75%. so it gives me a bit more time to wire tuck things.
 
Always happy to see new updates on this build thread but when I clicked on this page I immediately thought it had been in a bump and my heart sank.

Luckily it's just more progress, :) From your interior pictures I can see the centre dash is from a facelift ek9, was it easy installing this into your ek.
 
Epic build! The car has had a few different looks but tbh the way it is just now is the best so far! looks lovely.. Just get the twinloop exhaust on and it will look much better at the back :nice:
 
Always happy to see new updates on this build thread but when I clicked on this page I immediately thought it had been in a bump and my heart sank.

Luckily it's just more progress, :) From your interior pictures I can see the centre dash is from a facelift ek9, was it easy installing this into your ek.

Thank lol, as for the dash, its actually my stock dash. minus dying it black, changing the heater core to power, center vents, dash wiring, and climate controls. i done the whole swap in 2 hours. Only messy thing was heater core coolent hose lol.

Epic build! The car has had a few different looks but tbh the way it is just now is the best so far! looks lovely.. Just get the twinloop exhaust on and it will look much better at the back :nice:

yeah, my car has it phase like a teenager in high school lol. i always like the OEM hood. finally got it back on there. still waiting to get the rest of the wire tuck on the interior done. then off to the exhaust shop to get my new 3" piping and muffler welded on.

here some pictures as for update for wire tuck on the interior.


attachment.php

the previous owner left me this :/, so after i get my new viper alarm in the mail. im tearing the old one out and installing the new one. clean up the rat nest of wires @_@

attachment.php

i got rid of the a/c box, "need to buy the a/c delete heater duct", and took out the blower. So that i can run the under hood fuse box to the glove box. or some where clean looking.
 

Attachments

  • $2013-01-25 21.40.55.jpg
    $2013-01-25 21.40.55.jpg
    65 KB · Views: 3,545
  • $2013-01-27 11.29.17.jpg
    $2013-01-27 11.29.17.jpg
    55.1 KB · Views: 4,160
still cleaning up a bunch of wires and tucking them away etc.

got the CTR mirrors finished up and wired it to my alarm as well. so it arms and mirrors close and unfold when alarm is unlocked. still goto install my auto window roll up, and connect that to my sun/moon roof for kicks. heres a video of the PFM "power folding mirrors" in action with my alarm :D


Master Le: My J32a2 V6 turbo Civic HB: some small updates - YouTube


so got the most of the driver side wiring cleaned up 70%, and need to finish up on the passenger side. Then the engine bay... @_@ so much work..​
 
some more updates

got more wiring cleaned up, still relocating alot of the wiring. Got my new Viper Alarm installed and finishing up the driver side wire tuck

attachment.php


i received my Aerocatch Plus flush locking hood pins and installed them.

attachment.php


attachment.php

installed my wiper nozzles aswell :D

also installed my Password JDM Battery tie down. no pictures yet.

still to do list
-finished driver side wire tuck
-finish passenger side wire tuck
-relocate fuse box to glove box
-relocate vacuum hose
-relocate AFPR
-install RC 750CC injectors
-upgrade exhaust to 3"
-install radiator tuck once i get it.

enjoy.
 

Attachments

  • $aerocatch 2.jpg
    $aerocatch 2.jpg
    316.1 KB · Views: 5,090
  • $aero catch.jpg
    $aero catch.jpg
    344.6 KB · Views: 4,295
  • $more organizing.jpg
    $more organizing.jpg
    65.7 KB · Views: 4,349
Finally finished my interior wire tuck. got everything cleaned up and back together. got 90% of the engine bay wire tucked and reorganized hoses and etc. here are some before and after pictures

few shots of the messy area.

attachment.php


attachment.php


attachment.php


attachment.php


attachment.php


After

attachment.php


attachment.php


attachment.php


looks alot better then before. i'll be upgrading the fuel lines to -6 AN braided stainless steel lines. Upgrade FPR to Aeromotive FPR, and high flow fuel filter.

also relocated the fuse box to glove box :D. still got to bolt it down. enjoy.

attachment.php


Attachments

  • $bat and fuse box.jpg
    $bat and fuse box.jpg
    340.7 KB · Views: 4,847
  • $firewall.jpg
    $firewall.jpg
    89.8 KB · Views: 2,928
  • $driver side.jpg
    $driver side.jpg
    355.2 KB · Views: 2,801
  • $whole view.jpg
    $whole view.jpg
    90.2 KB · Views: 371
  • $new manifold.jpg
    $new manifold.jpg
    70.1 KB · Views: 3,399
  • $2013-02-06 14.23.41.jpg
    $2013-02-06 14.23.41.jpg
    87.6 KB · Views: 2,883
  • $2013-02-06 14.25.02.jpg
    $2013-02-06 14.25.02.jpg
    68.7 KB · Views: 2,922
  • $2013-02-06 14.23.52.jpg
    $2013-02-06 14.23.52.jpg
    97.8 KB · Views: 5,925
Last edited:
Epic build! can't see the pictures from above post ^
 
Back
Top