reiningblood
Reiningblood
- Joined
- Aug 9, 2012
- Messages
- 14
Right I thought I'd make my first official DIY post, this is only because I was looking at buying some "Smoked" headlights with some form of day runner lights... After hours on e B a Y, I found a set costing £156! Ridiculous!  So I thought, How Hard Can It Be??!
To start you will need:
-10mm spanner or socket set
-Scissor jack (only if your front end is lowered 40mm or more)
-Halfords Ford Mercury Grey £7
-EL Wire (Colour of your choice/not necessary) You will only need 2x1metre (£2.29 each)
-Heat Gun/Hair Dryer (whichever you prefer)
-Hot Soapy Water
-Lint Free Cloth
-Paper Towels
-Phillips screwdriver
-Flat head screwdriver
-Electrical Tape
-Superglue
(I only have a picture of it when it was done (sorry) but its so easy to follow)
Okay so, here we go!
Step 1: Remove the 4x10mm bolts that hold the light in place, 2x above the light when you open the bonnet, 1 in front of the radiator (you need to remove the grill and its tucked in there) and last one is by the bumper near the front wheel (its the only bolt that is horizontal not vertical that will remove the bumper!). Once all the bolts are out put them aside in a SAFE place!
Step 2: Disconnect all the wiring that goes to the lights, DO NOT (I REPEAT DO NOT TOUCH THE BULBS! the grease on your fingers will cause them to blow!) Once the wiring is disconnected pull the light out (I found this extremely difficult and ended up loosening the fenders ever so slightly to allow some room to wiggle out).
Step 3: Once the lights have been removed (DO BOTH TOGETHER TO COMPARE THE SHADES OF PAINT). Get your hairdryer or heat gun and start heating the silicone around the clear plastic and greyish plastic, don't heat one spot, keep going around until it is "tacky". Once "tacky" use the flat head screwdriver to pry the two apart, avoiding breaking the clips (if you do break any its not the end of the world). once apart remove the lights.
Step 4: The chrome piece is the part we want to paint, not the chrome piece where the main beam is. There is 2-4 little screws that hold the piece in, remove those and remove the chrome piece.
Step 5: With hot soapy water wash the chrome piece and then leave to dry, once dry using paper towels wipe of any residue left from the soapy water. Then use a lint free cloth and wipe everything down.
Step 6: Using several light coats of the Halfords Mercury Grey paint (gloss finish) spray the chrome piece until you are happy with the result.
Step 7: Repeat steps 1->6 on the other headlight until they match.
Step 8: Once they are completely dry (around 30mins/1hr) do the complete opposite (steps 6->1) and fit the head light back into the car.
Optional: If you do decide to go ahead with the "Halo" look, once you get to step 7 follow the next step!
Optional 2: Superglue the desired placement of the EL Wire and make sure that you have an exit for the wiring!
Now do steps 6->1 and re-assemble the light and fit it. Once it is fitted connect all the lights up to the wiring harnesses and then cut the molex connecter off. You are left with a Red and black wire, you can do it properly or the way I did it for a temporary fix, put your sidelights on (whilst it is disconnected and get someone to hold the EL Wire under a towel and slide the black and red wires into the sidelight connector until it lights up. Then with it still slid in connect the side light to the connector.
Again with a friend get them to place the towel over the headlight and turn the sidelights on and off a few times so that they can see if it is working properly or not. Once your happy, repeat on the other side.
And there you have it! Thats a £20 or less DIY job, 1hr 30mins as opposed to £150+ and 2-3days waiting.
Here is my light that I did when I finished it:
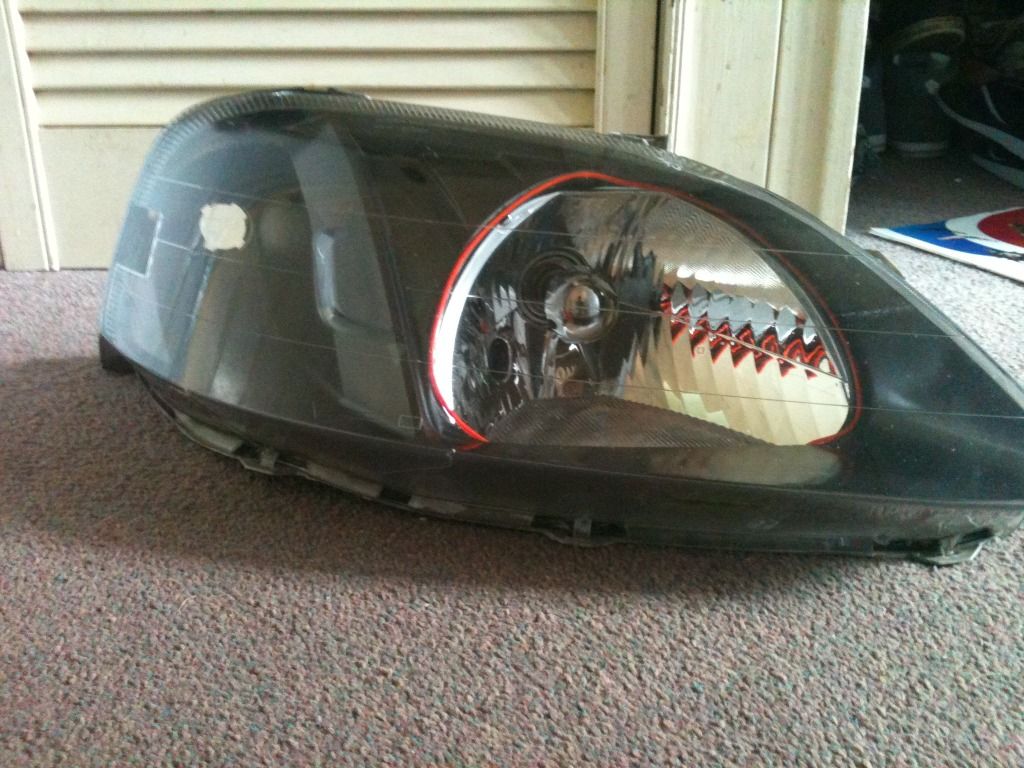
Not a bad end result for the price, and people have always asked me if I bought them like that, and are shocked when I say I did it!
Let me know what you think and if you decide to do this show some pictures!!
AND THIS IS PERFECTLY LEGAL!
WARNING: DO NOT TOUCH THE CLEAR PLASTIC WHEN REASSEMBLING IT FINGER PRINTS ARENT COOL!!! AND YOU DONT WANT TO RE-DO YOUR WORK JUST TO REMOVE A FINGERPRINT!!!
So I thought, How Hard Can It Be??!To start you will need:
-10mm spanner or socket set
-Scissor jack (only if your front end is lowered 40mm or more)
-Halfords Ford Mercury Grey £7
-EL Wire (Colour of your choice/not necessary) You will only need 2x1metre (£2.29 each)
-Heat Gun/Hair Dryer (whichever you prefer)
-Hot Soapy Water
-Lint Free Cloth
-Paper Towels
-Phillips screwdriver
-Flat head screwdriver
-Electrical Tape
-Superglue
(I only have a picture of it when it was done (sorry) but its so easy to follow)
Okay so, here we go!
Step 1: Remove the 4x10mm bolts that hold the light in place, 2x above the light when you open the bonnet, 1 in front of the radiator (you need to remove the grill and its tucked in there) and last one is by the bumper near the front wheel (its the only bolt that is horizontal not vertical that will remove the bumper!). Once all the bolts are out put them aside in a SAFE place!
Step 2: Disconnect all the wiring that goes to the lights, DO NOT (I REPEAT DO NOT TOUCH THE BULBS! the grease on your fingers will cause them to blow!) Once the wiring is disconnected pull the light out (I found this extremely difficult and ended up loosening the fenders ever so slightly to allow some room to wiggle out).
Step 3: Once the lights have been removed (DO BOTH TOGETHER TO COMPARE THE SHADES OF PAINT). Get your hairdryer or heat gun and start heating the silicone around the clear plastic and greyish plastic, don't heat one spot, keep going around until it is "tacky". Once "tacky" use the flat head screwdriver to pry the two apart, avoiding breaking the clips (if you do break any its not the end of the world). once apart remove the lights.
Step 4: The chrome piece is the part we want to paint, not the chrome piece where the main beam is. There is 2-4 little screws that hold the piece in, remove those and remove the chrome piece.
Step 5: With hot soapy water wash the chrome piece and then leave to dry, once dry using paper towels wipe of any residue left from the soapy water. Then use a lint free cloth and wipe everything down.
Step 6: Using several light coats of the Halfords Mercury Grey paint (gloss finish) spray the chrome piece until you are happy with the result.
Step 7: Repeat steps 1->6 on the other headlight until they match.
Step 8: Once they are completely dry (around 30mins/1hr) do the complete opposite (steps 6->1) and fit the head light back into the car.
Optional: If you do decide to go ahead with the "Halo" look, once you get to step 7 follow the next step!
Optional 2: Superglue the desired placement of the EL Wire and make sure that you have an exit for the wiring!
Now do steps 6->1 and re-assemble the light and fit it. Once it is fitted connect all the lights up to the wiring harnesses and then cut the molex connecter off. You are left with a Red and black wire, you can do it properly or the way I did it for a temporary fix, put your sidelights on (whilst it is disconnected and get someone to hold the EL Wire under a towel and slide the black and red wires into the sidelight connector until it lights up. Then with it still slid in connect the side light to the connector.
Again with a friend get them to place the towel over the headlight and turn the sidelights on and off a few times so that they can see if it is working properly or not. Once your happy, repeat on the other side.
And there you have it! Thats a £20 or less DIY job, 1hr 30mins as opposed to £150+ and 2-3days waiting.
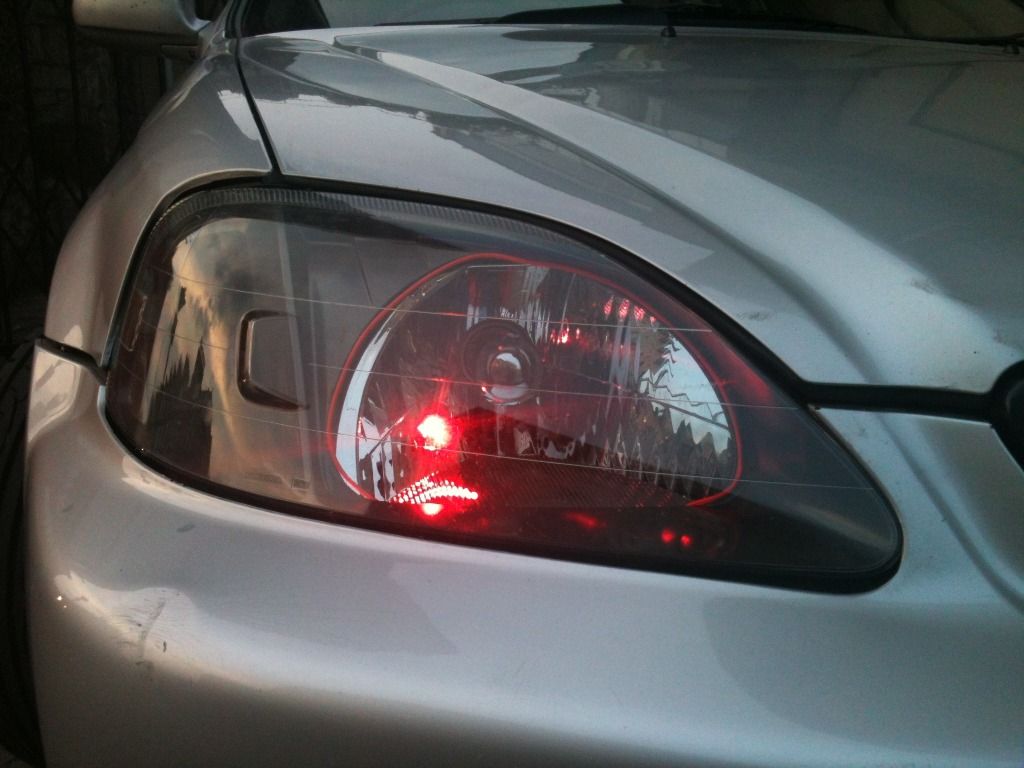
Here is my light that I did when I finished it:
Not a bad end result for the price, and people have always asked me if I bought them like that, and are shocked
when I say I did it!Let me know what you think and if you decide to do this show some pictures!!
AND THIS IS PERFECTLY LEGAL!
WARNING: DO NOT TOUCH THE CLEAR PLASTIC WHEN REASSEMBLING IT FINGER PRINTS ARENT COOL!!! AND YOU DONT WANT TO RE-DO YOUR WORK JUST TO REMOVE A FINGERPRINT!!!

 I fancy doing this just not keen on superglue either dont want my lights getting water/condensation in them