- Joined
- Aug 18, 2008
- Messages
- 4,081
Springs
Springs are the first port of call when we want to make our cars handle better. But what are we really trying to achieve by stiffening the suspension up? The biggest benefits are reduced body roll and quicker response to steering inputs. They have other benefits in terms of aesthetics and geometry but they are not of concern for now.
Body roll is a product of centrifugal (outwards) force acting upon the cars CoG with relation to the centripetal (inwards) force acting at the tyre contact patches (See Newton's 3rd Law). Because the CoG will always be above ground we create a torque moment (the roll couple) between the CoG and the tyre contact patches (weâll ignore Roll Centre for now, Iâll cover that when I get round to geometry) that serves to roll the sprung body mass outwards. This roll is counteracted by a combination of suspension geometry, springs and anti roll bars, which serve to alter the amount of load the tyres see, remembering of course that the total load transfer remains the same and thus is independent of roll.
Roll in itself is not bad, but the effects of it can be. The biggest downsides of excessive roll are low transient stability and dynamic geometry change. The former is something we are all familiar with in a softly sprung vehicle, fling it through a series of corners in quick succession and it will flop from side to side and generally feel a bit unstable.
The latter issue is maybe not so obvious. As a car rolls, the camber and toe angles will change, and depending on the type of suspension in question (MacPhearson strut, double wishbone, live axle etc) this will happen in different magnitudes. MacPhearson struts are particularly susceptible to this, as they roll they gain positive camber on the outside will in almost direct proportion to the total roll angle. Obviously keeping roll in check in this case improves grip considerably as camber angle is pretty critical to tyre grip.
So what happens when we fit stiffer springs? Stiffening the springs increases the anti-moment to the roll couple by pushing down harder on the outside wheel to counteract the outwards roll. Here we can see how the stiffness balance between front and rear axles affects front diagonal and thus oversteer/understeer. The stiffer axle pushes down harder on the outside wheel thus causing a bigger load differential on that axle and as a result generating less grip. Simples!
So stiffening the springs is great, let's make them rock solid and the car will handle like a Formula One car, right? Well no, it doesn't quite work like that. Stiff springs have their downsides as well as upsides. Downsides of an over stiff suspension include skittishness over bumpy roads and a lack of progression as the car starts to slide, not to mention the unbearable ride if you are getting old like me.
Stiff springs will make the car bounce following every disturbance as the wheel momentarily leaves the road. This causes the skittish behaviour over bumpy roads as all four wheels are constantly leaving and rejoining the tarmac, pulling the sprung mass all over the place. In addition, the stiffness causes the load transfer to happen quickly on turn in, meaning a sharp enough turn in can load up a tyre so quickly it almost instantly snaps into a slide, giving âknife edgeâ handling characteristics.
In comparison, a softer spring will allow the wheel to follow the imperfections in the road surface consistently, and load up the tyres slower allowing a more progressive feel as the driver is able to sense the tyres approaching their limits. Obviously, go too far and we are back at square one with a sloppy handling but safe car.
So clearly there is a balance to be struck, but how do we know what is ideal? Introducing the next term in the series, Natural Frequency.
Natural frequency is the relationship between gravity, a spring and the mass that it supports. Imagine a mass suspended by a spring. Pull down on that mass and release it and the mass will oscillate up and down at a set rate. The rate of this oscillation is the natural frequency of the system.
It is calculated as such:

Where K = spring rate in (N/m)
M = sprung mass (kg)
So assuming a sprung mass in the front of an EK9 of 312kg (688lbs) and a wheel* rate of 21437 Nm (250lb/in)
f = (1 / 2 . π") . (sqrt(21437/312))
. (sqrt(21437/312))
f = (0.159) . (sqrt(68.71))
f = 1.32 Hz
So a front frequency of 1.32 Hz, the same calculation for the rear gives us 1.75 Hz.
*Wheel rate is spring rate multiplied by motion ratio, (taken as roughly .7 front and rear in the EK) squared. So 250lb/in becomes 123lb/in at the wheel in this case. (See Motion ratio)
This frequency can be used to directly compare suspension stiffness between completely different cars as far apart as an F1 car and a limousine, as it simply relates the spring rate to the mass. Two cars that use completely different spring rates could have the same comparative stiffness as a result of the weight and motion ratio of the suspension.
So where should we be aiming with this frequency? Generally acceptable standards are as follows:
Comfortable road car - Up to 1hz
Sporty road car - 1 to 2 hz
Occasional track car - 2 to 2.5 hz
Full track / race car - 2.5 to 3.5hz
Race car with downforce - Over 4hz
These are ballpark and by no means set in stone, but they are a good guide to go by. Our 1.32/1.75 puts us neatly in the sporty road car section, which is what we would expect for a stock Type R. For a car driven regularly on the road, 2.5hz is probably about the maximum you would want to consider. For a full track car, frequencies over about 3.5hz do not yield much in the way of performance increases as the suspension simply becomes stiffer than required. Downforce equipped cars only require such high rates to control downwards body motion and stop the car bottoming out, and in the case of serious formula series cars, maintain the angle of attack of the wings to a specified operational window.
One thing to bear in mind is that you almost always want the rear frequency higher than the fronts. This is so that when the car rides a bump, the rear settles quicker than the front, aiming to have both axles return to equilibrium at the same time. If the frequencies are the same you risk ending up with an uncontrollable front and back pitching which is neither pleasant for the occupants nor good for performance. General recommended split is about around 0.2 to 0.3hz for optimum ride comfort, you can then alter this according to the handling balance you want.
Going on the 2.5hz maximum for the rear and a 2.1hz front to keep the .41hz F/R split of the stock EK9, we can calculate that it is best used with a maximum of 524lb/in (9.4Kg/mm) rear springs and 635lb/in (11.3Kg/mm) front springs.
So, now we know how to select suitable spring rates for our car!
Dampers
Once we have selected suitable spring rates to give the handling balance we want, it's time to consider the dampers. The purpose of the damper is to control the oscillation of the sprung mass so that it does not continue to bounce after a disturbance.
The image below illustrates different damping forces on a spring mass system:
In a critically damped system (green trace), the spring returns to its static deflection quickly with no overshoot.
In an over damped system (blue trace), the spring takes longer to return to static deflection than ideal.
In an under damped system (red trace), the spring continues to oscillate past static deflection for a few more cycles before coming to rest.
One would assume that critically damped is the ideal, however in reality the best damping ratio is about 65-70% under-damped, this allows the spring to overshoot slightly and return to static deflection quicker than critical.
So we want a damping ratio of 65%, but what does that mean exactly? Well that's where it gets pretty complicated. I have written a spreadsheet to calculate the ideal damper force/velocity curve for a given mass and spring rate, but the guts of it are well beyond the scope of this right now., however using this spreadsheet, I have created is the calculated ideal damper force/velocity curves for an EK9 on 635/524lb springs.
(This is the right shape, wrong values though, I have since corrected errors in the calculation)
Very nice, what the hell does it mean then?
What we have is damper force in lbs up the vertical scale, negative for bump/compression and positive for rebound/extension. (Some dyno charts will have these flipped, the giveaway is that rebound force should always be higher than compression)
Damper velocity is on the horizontal scale in in/sec. The four traces represent front (Red) and rear (Blue) bump (bottom) and rebound (top) forces.
For each trace, there is a low speed and high speed valving. Low speed generally controls the sprung mass body motions in roll and pitch, high speed controls the unsprung mass motions over road imperfections. We could loosely convert this to saying low speed controls handling and high speed controls ride. Itâs a little more involved, but thatâll do for now.
On the graph, low speed is the steeper section of the curve from 0 - 4in/sec, the high speed section from 4in/sec onwards. The graph depicts a digressive valved damper where there is a visible knee in the damping force between the low and high speed section. This allows the damper to control low speed body motions with a high rate, while softening the force at higher speeds when absorbing bumps. This is ideal due to the effects of transmissibility, the relationship between the deflection of the sprung and unsprung mass.
Transmissibility is another subject that is not really required to go into depth on here, we'll keep it simple in saying that to keep sprung mass movement to a minimum at low damper speeds, a high damping ratio is needed and at high damper speeds, a lower damping ratio is needed. This is the basis of the digressively valved damper, the knee representing the point at which we switch.
As mentioned earlier, running too much either side of this 65% ideal starts to have implications on the response and handling of the car. Too high a damping ratio and the suspension becomes over-damped. Rigid, slow to respond and resulting in a crashy ride and 'jacking down' of the suspension, where the wheel fails to return to static position before the next bump, causing the wheel to jack up into the wheel arch. Too low a damping ratio and the suspension becomes under-damped, the springs overpower the damper and the car becomes wallowy, continuing to bounce after a disturbance.
We can see from this why making large adjustments to balance using the dampers is not ideal. Minor tweaks are fine, but trying to compensate for the wrong spring rate by cranking the damping up and down is only going to cause unwanted handling traits.
So we've now got an ideal damper/force curve, so time to pick a good damper.
Enter the minefield...
All dampers are not equalâ¦
(â¦especially not dampeners. A damper only becomes a dampener when you buy cheap equipment that bursts seals and leaks oil everywhere. )
Please be aware that a lot of the following is simply my opinion on the best course of action for selecting good dampers. The majority of people cannot be bothered with all this, and I can fully appreciate that, so feel free to pick and choose which bits to listen to.
Choosing the right dampers is nothing short of a nightmare, there is a such a variety on the market each with their own pros and cons, qualities and pitfalls and on top of that, so many people eager to tell you their opinion of a particular damper when it is clear they have absolutely no idea what they are talking about. In my opinion, you should always start your search in a quantitative manner, then move on to qualitative recommendations once you have weeded out the crap.
When choosing a damper, you should always attempt to match the damper to your spring choice, not the other way round. Some dampers such as Koni and Bilstein are easily revalveable, others not so much. A re-valveable damper means that you can send it off to a specialist and have it valves exactly for your requirements, which is no doubt about it, the best way to go.
If this isnât an option, then the next best thing is search endlessly for damper dyno charts of various dampers and find one that is the closest match for your application. Try to find independent tests because it is not unheard of for manufacturers in the lower end of the market to put a favourable looking dyno plot on their website, which in no way corresponds to how they actually test at on an independent dyno.
When checking these dyno plots, there are a few things you want to be on the look out for besides checking they match the rest of your setup.
Shape You will typically have three shapes of force/velocity curves.
Adjustability
Adjustable dampers arenât a necessity at all if youâve specced everything correctly, however if you are looking at some, heres a few things to look out for.
When considering purchasing a set of dampers, always ask the dealer/manufacturer for the dyno chart for each one that you are buying, any reputable manufacturer will provide these as they will dyno each individual damper to check its performance. If they donât/wonât/canât provide these then you should be questioning why not, you as the buyer want proof that the items you are buying are matched in performance!
Once youâve found some suitable dampers, and the dealer/manufacturer can provide the individual dyno results for each one, you can be pretty much assured that youâre going to get some good quality equipment. At this point you might want to check for reports on the quality of the dampers, reported faults or changes in performance with age/wear etc but chances are, if youâve got this far then what you are looking at is pretty expensive equipment from an industry leading brand and shouldnât fall flat on anything like this.
So, that should be a decent set of dampers sorted thenâ¦
Setting up the damping the proper way⦠a bigger minefield.
As I said earlier, using the damping to make up for a poor spring choice is a bad idea as you end up over or under damping the system and negatively affecting itâs performance. Adjustable dampers are used to change the handling in motorsport, but not by virtue of simply stopping body roll like the springs do, instead they affect the speed of load transfer in a corner. In order to do this, the suspension must be in motion, that is the damper piston must be moving in either rebound or compression, in order for it to exert any force. Minor adjustments to the compression and rebound damping will effect how quickly weight is transferred as you turn into and accelerate out of a corner, depending on what direction the damper at a particular corner is travelling in and the corresponding tyreâs contribution to overall grip at that particular time.
Confused yet?
We will take the simple 3 stage view of a corner, turning in whilst braking, steady state cornering and accelerating out post apex. You can break this down further but it gets seriously confusing.
Remember during this that increasing force in one direction is to slow it down in that direction. When you add compression, you actually add a force in the rebound direction, causing the damper to compress slower. Reducing compression does the reverse and so on so forthâ¦
Stage one â Braking and turning in.
Hard on the brakes as you approach the corner, the front loads up as the weight shifts forwards, and the front dampers move in compression. Likewise, as the rear of the car lifts, the rear dampers move in rebound. As you turn in, the outside front damper moves even further into compression and the inside rear further into rebound. For now we assume the inside front and outside rear are making an equal contribution and cancel each other out.
In this situation, increasing the front compression damping, or slowing the rate of compression down, will load up that front outside wheel quicker. Bigger load differential across the front axle = less grip and turn in understeer.
Increasing rear rebound damping (slowing the speed of rebound) means we unload the inside rear wheel quicker. Bigger load differential across the rear axle = turn in oversteer.
Obviously, reversing these adjustments has the opposite effect, less front compression gives you less turn in understeer, less rear rebound gives you less turn in oversteer.
Stage 2 â Steady state cornering.
We have now reached optimum cornering speed and proceed round the middle part of turn at a constant velocity. The outside dampers front and rear are in compression and the inside pair are in rebound, however crucially, none of them are moving.
Since dampers only produce force in motion, they are completely out of the equation for this stage of the corner. The grip balance relies solely on the cars basic parameters (track, CGH weight) and the roll resistance from the springs, bars and suspension geometry.
Stage 3 â Accelerating post apex.
Past the apex, we start applying throttle, shifting load rearwards. The front suspension now moves in rebound and the rear in compression. As we start unwinding the steering and accelerating harder, the outside front wheel moves further in rebound and the inside rear further into compression.
In this situation, adding front rebound slows the rate if load transfer to the inside front tyre, keeping the load differential high and causing exit understeer.
Adding rear compression has a similar effect in slowing the rate of load transfer from outside rear to inside rear causing exit oversteer.
We can now understand how making damper adjustments actually affects the handling balance of a car on track, pretty simple in the end eh?
More than happy to answer any questions, expand on any areas and accept constructive criticism on any areas you might feel I have got wrong, otherwise I hope it helped!
At some point soon, I may cover geometry and anti-roll bars, but I have a busy couple of weeks coming up so it may take a while!
Any reps greatly appreciated!
Springs are the first port of call when we want to make our cars handle better. But what are we really trying to achieve by stiffening the suspension up? The biggest benefits are reduced body roll and quicker response to steering inputs. They have other benefits in terms of aesthetics and geometry but they are not of concern for now.
Body roll is a product of centrifugal (outwards) force acting upon the cars CoG with relation to the centripetal (inwards) force acting at the tyre contact patches (See Newton's 3rd Law). Because the CoG will always be above ground we create a torque moment (the roll couple) between the CoG and the tyre contact patches (weâll ignore Roll Centre for now, Iâll cover that when I get round to geometry) that serves to roll the sprung body mass outwards. This roll is counteracted by a combination of suspension geometry, springs and anti roll bars, which serve to alter the amount of load the tyres see, remembering of course that the total load transfer remains the same and thus is independent of roll.
Roll in itself is not bad, but the effects of it can be. The biggest downsides of excessive roll are low transient stability and dynamic geometry change. The former is something we are all familiar with in a softly sprung vehicle, fling it through a series of corners in quick succession and it will flop from side to side and generally feel a bit unstable.
The latter issue is maybe not so obvious. As a car rolls, the camber and toe angles will change, and depending on the type of suspension in question (MacPhearson strut, double wishbone, live axle etc) this will happen in different magnitudes. MacPhearson struts are particularly susceptible to this, as they roll they gain positive camber on the outside will in almost direct proportion to the total roll angle. Obviously keeping roll in check in this case improves grip considerably as camber angle is pretty critical to tyre grip.
So what happens when we fit stiffer springs? Stiffening the springs increases the anti-moment to the roll couple by pushing down harder on the outside wheel to counteract the outwards roll. Here we can see how the stiffness balance between front and rear axles affects front diagonal and thus oversteer/understeer. The stiffer axle pushes down harder on the outside wheel thus causing a bigger load differential on that axle and as a result generating less grip. Simples!
So stiffening the springs is great, let's make them rock solid and the car will handle like a Formula One car, right? Well no, it doesn't quite work like that. Stiff springs have their downsides as well as upsides. Downsides of an over stiff suspension include skittishness over bumpy roads and a lack of progression as the car starts to slide, not to mention the unbearable ride if you are getting old like me.
Stiff springs will make the car bounce following every disturbance as the wheel momentarily leaves the road. This causes the skittish behaviour over bumpy roads as all four wheels are constantly leaving and rejoining the tarmac, pulling the sprung mass all over the place. In addition, the stiffness causes the load transfer to happen quickly on turn in, meaning a sharp enough turn in can load up a tyre so quickly it almost instantly snaps into a slide, giving âknife edgeâ handling characteristics.
In comparison, a softer spring will allow the wheel to follow the imperfections in the road surface consistently, and load up the tyres slower allowing a more progressive feel as the driver is able to sense the tyres approaching their limits. Obviously, go too far and we are back at square one with a sloppy handling but safe car.
So clearly there is a balance to be struck, but how do we know what is ideal? Introducing the next term in the series, Natural Frequency.
Natural frequency is the relationship between gravity, a spring and the mass that it supports. Imagine a mass suspended by a spring. Pull down on that mass and release it and the mass will oscillate up and down at a set rate. The rate of this oscillation is the natural frequency of the system.
It is calculated as such:
Where K = spring rate in (N/m)
M = sprung mass (kg)
So assuming a sprung mass in the front of an EK9 of 312kg (688lbs) and a wheel* rate of 21437 Nm (250lb/in)
f = (1 / 2 . π
. (sqrt(21437/312))f = (0.159) . (sqrt(68.71))
f = 1.32 Hz
So a front frequency of 1.32 Hz, the same calculation for the rear gives us 1.75 Hz.
*Wheel rate is spring rate multiplied by motion ratio, (taken as roughly .7 front and rear in the EK) squared. So 250lb/in becomes 123lb/in at the wheel in this case. (See Motion ratio)
This frequency can be used to directly compare suspension stiffness between completely different cars as far apart as an F1 car and a limousine, as it simply relates the spring rate to the mass. Two cars that use completely different spring rates could have the same comparative stiffness as a result of the weight and motion ratio of the suspension.
So where should we be aiming with this frequency? Generally acceptable standards are as follows:
Comfortable road car - Up to 1hz
Sporty road car - 1 to 2 hz
Occasional track car - 2 to 2.5 hz
Full track / race car - 2.5 to 3.5hz
Race car with downforce - Over 4hz
These are ballpark and by no means set in stone, but they are a good guide to go by. Our 1.32/1.75 puts us neatly in the sporty road car section, which is what we would expect for a stock Type R. For a car driven regularly on the road, 2.5hz is probably about the maximum you would want to consider. For a full track car, frequencies over about 3.5hz do not yield much in the way of performance increases as the suspension simply becomes stiffer than required. Downforce equipped cars only require such high rates to control downwards body motion and stop the car bottoming out, and in the case of serious formula series cars, maintain the angle of attack of the wings to a specified operational window.
One thing to bear in mind is that you almost always want the rear frequency higher than the fronts. This is so that when the car rides a bump, the rear settles quicker than the front, aiming to have both axles return to equilibrium at the same time. If the frequencies are the same you risk ending up with an uncontrollable front and back pitching which is neither pleasant for the occupants nor good for performance. General recommended split is about around 0.2 to 0.3hz for optimum ride comfort, you can then alter this according to the handling balance you want.
Going on the 2.5hz maximum for the rear and a 2.1hz front to keep the .41hz F/R split of the stock EK9, we can calculate that it is best used with a maximum of 524lb/in (9.4Kg/mm) rear springs and 635lb/in (11.3Kg/mm) front springs.
So, now we know how to select suitable spring rates for our car!
Dampers
Once we have selected suitable spring rates to give the handling balance we want, it's time to consider the dampers. The purpose of the damper is to control the oscillation of the sprung mass so that it does not continue to bounce after a disturbance.
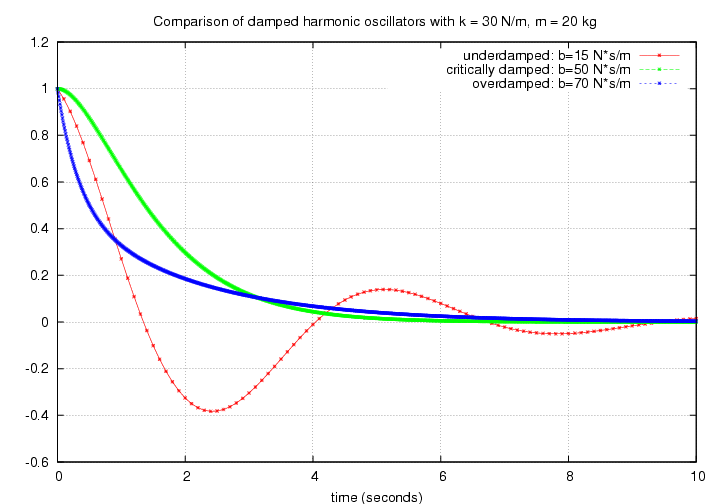
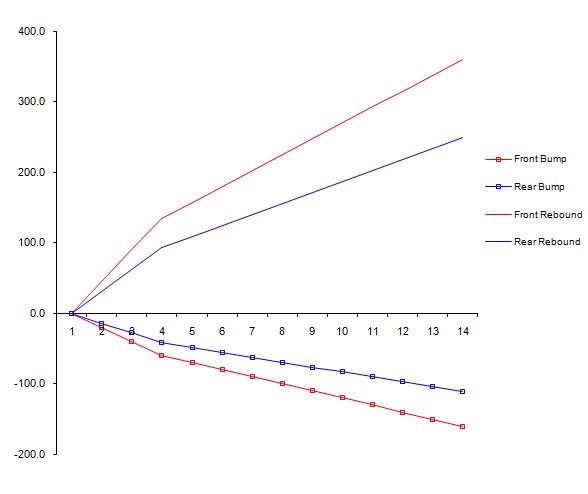
The image below illustrates different damping forces on a spring mass system:
In a critically damped system (green trace), the spring returns to its static deflection quickly with no overshoot.
In an over damped system (blue trace), the spring takes longer to return to static deflection than ideal.
In an under damped system (red trace), the spring continues to oscillate past static deflection for a few more cycles before coming to rest.
One would assume that critically damped is the ideal, however in reality the best damping ratio is about 65-70% under-damped, this allows the spring to overshoot slightly and return to static deflection quicker than critical.
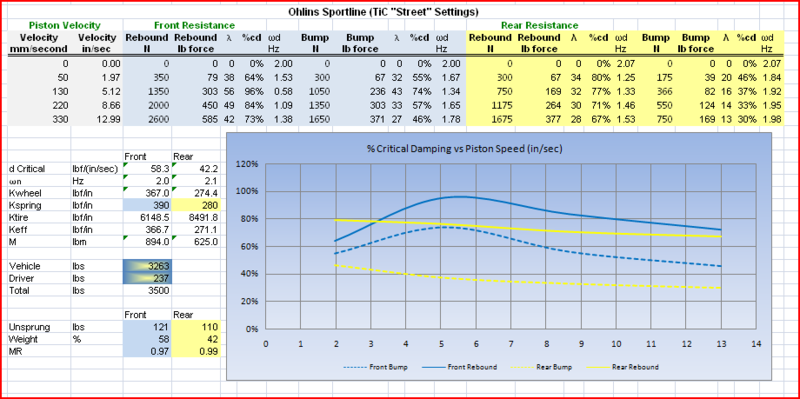
So we want a damping ratio of 65%, but what does that mean exactly? Well that's where it gets pretty complicated. I have written a spreadsheet to calculate the ideal damper force/velocity curve for a given mass and spring rate, but the guts of it are well beyond the scope of this right now., however using this spreadsheet, I have created is the calculated ideal damper force/velocity curves for an EK9 on 635/524lb springs.
(This is the right shape, wrong values though, I have since corrected errors in the calculation)
Very nice, what the hell does it mean then?
What we have is damper force in lbs up the vertical scale, negative for bump/compression and positive for rebound/extension. (Some dyno charts will have these flipped, the giveaway is that rebound force should always be higher than compression)
Damper velocity is on the horizontal scale in in/sec. The four traces represent front (Red) and rear (Blue) bump (bottom) and rebound (top) forces.
For each trace, there is a low speed and high speed valving. Low speed generally controls the sprung mass body motions in roll and pitch, high speed controls the unsprung mass motions over road imperfections. We could loosely convert this to saying low speed controls handling and high speed controls ride. Itâs a little more involved, but thatâll do for now.
On the graph, low speed is the steeper section of the curve from 0 - 4in/sec, the high speed section from 4in/sec onwards. The graph depicts a digressive valved damper where there is a visible knee in the damping force between the low and high speed section. This allows the damper to control low speed body motions with a high rate, while softening the force at higher speeds when absorbing bumps. This is ideal due to the effects of transmissibility, the relationship between the deflection of the sprung and unsprung mass.
Transmissibility is another subject that is not really required to go into depth on here, we'll keep it simple in saying that to keep sprung mass movement to a minimum at low damper speeds, a high damping ratio is needed and at high damper speeds, a lower damping ratio is needed. This is the basis of the digressively valved damper, the knee representing the point at which we switch.
As mentioned earlier, running too much either side of this 65% ideal starts to have implications on the response and handling of the car. Too high a damping ratio and the suspension becomes over-damped. Rigid, slow to respond and resulting in a crashy ride and 'jacking down' of the suspension, where the wheel fails to return to static position before the next bump, causing the wheel to jack up into the wheel arch. Too low a damping ratio and the suspension becomes under-damped, the springs overpower the damper and the car becomes wallowy, continuing to bounce after a disturbance.
We can see from this why making large adjustments to balance using the dampers is not ideal. Minor tweaks are fine, but trying to compensate for the wrong spring rate by cranking the damping up and down is only going to cause unwanted handling traits.
So we've now got an ideal damper/force curve, so time to pick a good damper.
Enter the minefield...
All dampers are not equalâ¦
(â¦especially not dampeners. A damper only becomes a dampener when you buy cheap equipment that bursts seals and leaks oil everywhere.
)Please be aware that a lot of the following is simply my opinion on the best course of action for selecting good dampers. The majority of people cannot be bothered with all this, and I can fully appreciate that, so feel free to pick and choose which bits to listen to.
Choosing the right dampers is nothing short of a nightmare, there is a such a variety on the market each with their own pros and cons, qualities and pitfalls and on top of that, so many people eager to tell you their opinion of a particular damper when it is clear they have absolutely no idea what they are talking about. In my opinion, you should always start your search in a quantitative manner, then move on to qualitative recommendations once you have weeded out the crap.
When choosing a damper, you should always attempt to match the damper to your spring choice, not the other way round. Some dampers such as Koni and Bilstein are easily revalveable, others not so much. A re-valveable damper means that you can send it off to a specialist and have it valves exactly for your requirements, which is no doubt about it, the best way to go.
If this isnât an option, then the next best thing is search endlessly for damper dyno charts of various dampers and find one that is the closest match for your application. Try to find independent tests because it is not unheard of for manufacturers in the lower end of the market to put a favourable looking dyno plot on their website, which in no way corresponds to how they actually test at on an independent dyno.
When checking these dyno plots, there are a few things you want to be on the look out for besides checking they match the rest of your setup.
Shape You will typically have three shapes of force/velocity curves.
Digressive.
As stated before, you really want to be looking for a digressive type curve where damper force reduces as the piston velocity increases, this is the best of both worlds as you get firm body control and a good ride.
Linear
A lot of JDM dampers have linear damping, which if used purely on track is not necessarily bad, however in order to get the low speed damping required to control body motion, the high speed damping force goes through the roof and causes an incredibly crashy ride bumpy roads. Good handling, crap ride.
Progressive
One to steer well clear of is any dyno plot with a progressive curve, i.e. one where force increases as piston speed increases. This is just bad in every way, youâll have poor control over body motion and a crap ride too, worst of both worlds.
Adjustability
Adjustable dampers arenât a necessity at all if youâve specced everything correctly, however if you are looking at some, heres a few things to look out for.
Linear progression
Check that the force curve for each adjustment is a good progression on from the one before it. Good brands will have somewhat linear steps between each adjustment, cheaper ones can tend to be all over the place, with 2 clicks making a massive change at one point and 8 clicks making almost no difference at another. Some brands can even have adjustments going the wrong way, with some full stiff settings being softer than full soft!
The various adjustment traces should also ideally follow a similar shape curve, beware of any that start out progressive and go digressive as theyâll be a nightmare to ever get performing correctly.
Rebound/compression isolation
Most adjustables on the market are rebound adjustable only, so check that adjustments made to the rebound have no effect on the compression damping. If it does affect compression, make sure it is a mirror of the effect on the rebound curve.
When considering purchasing a set of dampers, always ask the dealer/manufacturer for the dyno chart for each one that you are buying, any reputable manufacturer will provide these as they will dyno each individual damper to check its performance. If they donât/wonât/canât provide these then you should be questioning why not, you as the buyer want proof that the items you are buying are matched in performance!
Once youâve found some suitable dampers, and the dealer/manufacturer can provide the individual dyno results for each one, you can be pretty much assured that youâre going to get some good quality equipment. At this point you might want to check for reports on the quality of the dampers, reported faults or changes in performance with age/wear etc but chances are, if youâve got this far then what you are looking at is pretty expensive equipment from an industry leading brand and shouldnât fall flat on anything like this.
So, that should be a decent set of dampers sorted thenâ¦
Setting up the damping the proper way⦠a bigger minefield.
As I said earlier, using the damping to make up for a poor spring choice is a bad idea as you end up over or under damping the system and negatively affecting itâs performance. Adjustable dampers are used to change the handling in motorsport, but not by virtue of simply stopping body roll like the springs do, instead they affect the speed of load transfer in a corner. In order to do this, the suspension must be in motion, that is the damper piston must be moving in either rebound or compression, in order for it to exert any force. Minor adjustments to the compression and rebound damping will effect how quickly weight is transferred as you turn into and accelerate out of a corner, depending on what direction the damper at a particular corner is travelling in and the corresponding tyreâs contribution to overall grip at that particular time.
Confused yet?
We will take the simple 3 stage view of a corner, turning in whilst braking, steady state cornering and accelerating out post apex. You can break this down further but it gets seriously confusing.
Remember during this that increasing force in one direction is to slow it down in that direction. When you add compression, you actually add a force in the rebound direction, causing the damper to compress slower. Reducing compression does the reverse and so on so forthâ¦
Stage one â Braking and turning in.
Hard on the brakes as you approach the corner, the front loads up as the weight shifts forwards, and the front dampers move in compression. Likewise, as the rear of the car lifts, the rear dampers move in rebound. As you turn in, the outside front damper moves even further into compression and the inside rear further into rebound. For now we assume the inside front and outside rear are making an equal contribution and cancel each other out.
In this situation, increasing the front compression damping, or slowing the rate of compression down, will load up that front outside wheel quicker. Bigger load differential across the front axle = less grip and turn in understeer.
Increasing rear rebound damping (slowing the speed of rebound) means we unload the inside rear wheel quicker. Bigger load differential across the rear axle = turn in oversteer.
Obviously, reversing these adjustments has the opposite effect, less front compression gives you less turn in understeer, less rear rebound gives you less turn in oversteer.
Stage 2 â Steady state cornering.
We have now reached optimum cornering speed and proceed round the middle part of turn at a constant velocity. The outside dampers front and rear are in compression and the inside pair are in rebound, however crucially, none of them are moving.
Since dampers only produce force in motion, they are completely out of the equation for this stage of the corner. The grip balance relies solely on the cars basic parameters (track, CGH weight) and the roll resistance from the springs, bars and suspension geometry.
Stage 3 â Accelerating post apex.
Past the apex, we start applying throttle, shifting load rearwards. The front suspension now moves in rebound and the rear in compression. As we start unwinding the steering and accelerating harder, the outside front wheel moves further in rebound and the inside rear further into compression.
In this situation, adding front rebound slows the rate if load transfer to the inside front tyre, keeping the load differential high and causing exit understeer.
Adding rear compression has a similar effect in slowing the rate of load transfer from outside rear to inside rear causing exit oversteer.
We can now understand how making damper adjustments actually affects the handling balance of a car on track, pretty simple in the end eh?
More than happy to answer any questions, expand on any areas and accept constructive criticism on any areas you might feel I have got wrong, otherwise I hope it helped!
At some point soon, I may cover geometry and anti-roll bars, but I have a busy couple of weeks coming up so it may take a while!
Any reps greatly appreciated!
Last edited: