ej9 to rally car


dave benson

Member
Joined
Jul 24, 2008
Messages
401
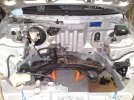
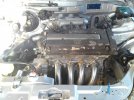
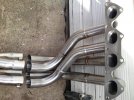
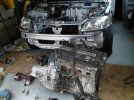
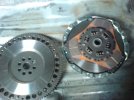
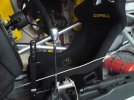
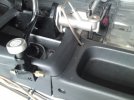
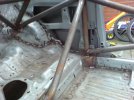
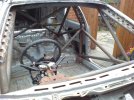
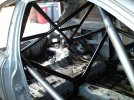
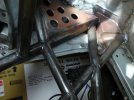
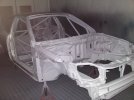
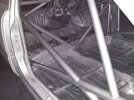
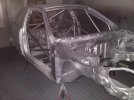
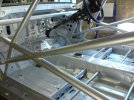
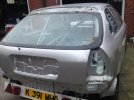
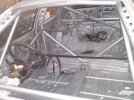
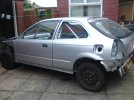
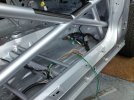
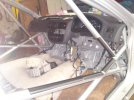
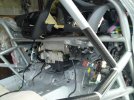
ok here we go, bought this ej9 2 years ago to build into a rally car, thought it would take me six months, how wrong was i !
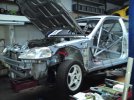
sold my old 205 rally car which had been very successful, with much needed backing from DES Electrical of Blackpool and UK Carline.co.uk of Bilborrow near Preston.The civic would be a big step up in performance and hopefully results, but it has taken a lot longer than i thought but she's almost there, thought i would share the build with you guys as i've learnt a hell of alot of info from on here and bought plenty of parts as well:thanks:
 

Attachments

  • $DSC00326.jpg
    $DSC00326.jpg
    84.7 KB · Views: 737
Last edited:
first job was to strip her out
 

Attachments

  • $DSC00325.JPG
    $DSC00325.JPG
    203.4 KB · Views: 794
  • $DSC00320.JPG
    $DSC00320.JPG
    259.7 KB · Views: 684
  • $DSC00321.JPG
    $DSC00321.JPG
    259.5 KB · Views: 720
then had the cage welded in, it was a custom cage, but was fitted at tornado motorsport to save money, it cost 200 quid less and he did loads of seamwelding
 

Attachments

  • $DSC00303.JPG
    $DSC00303.JPG
    206.9 KB · Views: 785
  • $DSC00305.JPG
    $DSC00305.JPG
    276.9 KB · Views: 790
  • $DSC00309.JPG
    $DSC00309.JPG
    183.7 KB · Views: 747
  • $DSC00307.JPG
    $DSC00307.JPG
    258.8 KB · Views: 796
  • $DSC00304.jpg
    $DSC00304.jpg
    132.5 KB · Views: 726
then i had to decorate the hallway:(
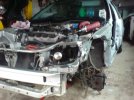
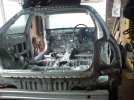
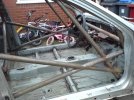
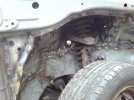
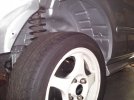
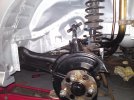
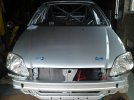
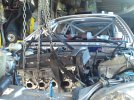
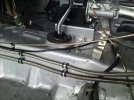
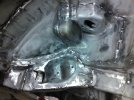
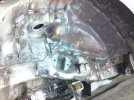
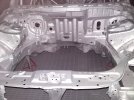
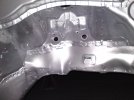
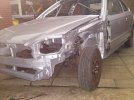
( and she went rusty, so loads of rust treatment and god knows how many wire brushes fof the drill she was ready to paint

i was still finding wires from the brushes about a year later still stuck in my clothes, in the soles of my trainers, and had to go to a+e to have one removed from my eye, before i went to work lol !
 

Attachments

  • $DSC00037.jpg
    $DSC00037.jpg
    344.7 KB · Views: 677
  • $DSC00029.jpg
    $DSC00029.jpg
    355.1 KB · Views: 711
  • $DSC00038.jpg
    $DSC00038.jpg
    361.7 KB · Views: 664
  • $DSC00031.jpg
    $DSC00031.jpg
    346.5 KB · Views: 719
  • $DSC00028.jpg
    $DSC00028.jpg
    354.8 KB · Views: 638
someone reversed into my road car and when i was at the body shop the boss agreed to paint the whole shell, inside/outside/engine bay and under arches for a grand, so bit his hand off
 

Attachments

  • $DSC00108.jpg
    $DSC00108.jpg
    357.6 KB · Views: 732
  • $DSC00127.jpg
    $DSC00127.jpg
    357.1 KB · Views: 690
  • $DSC00126.jpg
    $DSC00126.jpg
    363 KB · Views: 671
  • $DSC00129.jpg
    $DSC00129.jpg
    362.9 KB · Views: 662
  • $DSC00128.jpg
    $DSC00128.jpg
    350.4 KB · Views: 616
back from the paint shop all nice and shiny
 

Attachments

  • $DSC00238.jpg
    $DSC00238.jpg
    357.4 KB · Views: 644
  • $DSC00236.jpg
    $DSC00236.jpg
    351.4 KB · Views: 611
  • $DSC00232.jpg
    $DSC00232.jpg
    356.2 KB · Views: 583
  • $DSC00234.jpg
    $DSC00234.jpg
    363.5 KB · Views: 620
  • $DSC00228.jpg
    $DSC00228.jpg
    353.3 KB · Views: 747
start to fit the dash + wiring loom. Had to cut the loom to fit it behind the cage and resolder it, 50 wires doh !

wanted to keep the heater in as febuary is a bit cold with just a heated screen, so made some ducting to join the blower and heater unit together, and because the roll cage stopped the blower mounting where it should made some brackets to mount that
 

Attachments

  • $DSC00239.jpg
    $DSC00239.jpg
    364.8 KB · Views: 2,731
  • $DSC00242.jpg
    $DSC00242.jpg
    350.6 KB · Views: 609
  • $DSC00241.jpg
    $DSC00241.jpg
    362 KB · Views: 663
looking good mate :) download photobucket and copy and paste the url links into ur build and the photos will be bigger :)
 
looking good but should have done it in an another colour. something one off.
 
Looks stunning mate.

What part of the heater fouled on the cage? as im just about to start a build of my new rally car for next year, and my custom cages cage arrived last friday, and picking up an ek9 shell hopefully this weekend.

Going for tarmac or forrest? sorry if ive missed that bit!!
 
tarmac for now, till it gets a bit battered:))

the blower motor mounts to the side where the big gusset is in the photo, and takes up an inch or two of space, so hung it off the rollcage crossbar behind the dash

if your short like me 5'7, then the custom cage is a bit of a houdini job getting in and out !

the seat rails also needed lowering as your head hits the cage if they are too high !
 
Last edited:
no you will be fine as you will have long legs so will sit quite far back, i sit quite far forward and its a bit of a battle to get out, watch the seat rails though !
 
started trying to find everything and remenber where it went lol

got a rear disc conversion from a mb6 and fitted polybush trailing arm bushes and painted it all, also fitted some rosejointed rear camber arms (m factory)
 

Attachments

  • $DSC00282.jpg
    $DSC00282.jpg
    368.9 KB · Views: 599
  • $DSC00280.jpg
    $DSC00280.jpg
    375 KB · Views: 747
  • $DSC00279.jpg
    $DSC00279.jpg
    353.8 KB · Views: 673
  • $DSC00278.jpg
    $DSC00278.jpg
    362.5 KB · Views: 719
  • $DSC00274.jpg
    $DSC00274.jpg
    354.1 KB · Views: 614
fitted alloy rad, and bought exedy paddle clutch and lighter flywheel, all off ebay !

fitted dummy engine to check things out, engine mounts etc and a very nice exhaust which i had to sell on as it hung too low below the sump, meaning the sumpgaurd was almost on the floor
 

Attachments

  • $DSC00619.jpg
    $DSC00619.jpg
    358.6 KB · Views: 615
  • $DSC00086.jpg
    $DSC00086.jpg
    373 KB · Views: 586
  • $DSC00430.jpg
    $DSC00430.jpg
    386.6 KB · Views: 589
  • $DSC00423.jpg
    $DSC00423.jpg
    381.3 KB · Views: 598
  • $DSC00318.JPG
    $DSC00318.JPG
    176.6 KB · Views: 587
off she went to the garage to get the brake pipes done, bought a ek9 gearstick and linkage, extended the gearstick but it was far too long so shortened it again !
got a couple of new seats (600 quid-gulp)
then fitted a 1 inch master cylinder and servo, and an adjustable bias valve and upright hydraulic handbrake

also fitted the skunk front camber arms
 

Attachments

  • $DSC00640.jpg
    $DSC00640.jpg
    364.6 KB · Views: 757
  • $DSC00718.jpg
    $DSC00718.jpg
    358.8 KB · Views: 649
  • $DSC00897.jpg
    $DSC00897.jpg
    358.2 KB · Views: 674
  • $DSC00896.jpg
    $DSC00896.jpg
    356.5 KB · Views: 678
  • $DSC00900.jpg
    $DSC00900.jpg
    354 KB · Views: 642
Looking good.
Question...,what have you done to plumb the brakes? straight off the master cylinder t'ing off for the front, and running the rear through a bias valve etc, or are you still using the standard distrubution block on the bulkhead? My doner ek4 has abs which i obviously wont be using, just been wondering about the simplest way to plumb it once that is ditched.

Got a test day booked for the 4th of march so after i pick up my ek9 shell tomorrow im going to be a busy boy!!
 
Back
Top